

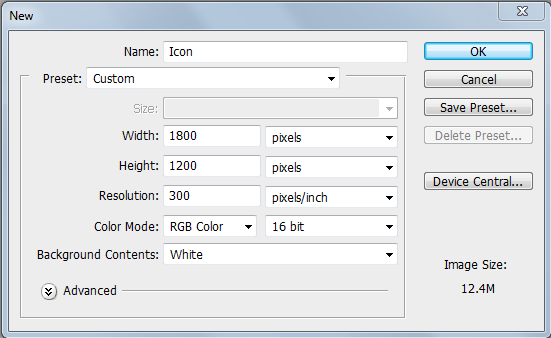
1. Open Photoshop and create new project. Use the following setting:
After that, with your move tool (Ctrl+V) create two guide lines to meet in the middle of the canvas like so:

This is basically going to make our life easier once creating the circles.
3.Now we are going to create two layers from the bottom layer panel. Name one "big_circle" and the second once "small_circle"

Make sure you have the "big_circle" layer selected. Now to make a nice circle use the Elliptical Marquee circle on the top left corner:

TIP: Start from the center and hold Alt+Shift and you should get a perfect circle down the middle.
Keep in mind you have not created the circle yet! you only have a selection. right click inside the selection and press "fill"

On the use section select color > A color window should pop up; select a color of your choice some what dark.
4. Now that you have created your first circle we have to create the "small_circle". Select the layer and follow the same exact steps but now create a smaller circle inside the "big_circle" and fill it the same color but slightly lighter. like this:

I forgot to mention this but might as well do it now...you could have also done this from the start. Select the "BG" layer and on the bottom of the layer panel there is an FX icon, add to the background gradient effect. Just so everything can look so much cooler!

5. Now to create the small rim around our two circles. First you going to press Ctrl+Right click on the "big_circle" and you should have the same selection you made previously.
Now we need to expand the circle 6 pixels and to do so follow this steps:
Select>Modify>Expand

Select OK.
Now create a new layer and call this "inner_rim" > Fill it just like you filled the circles but this time black. Position this layer bellow the "big_circle" layer.
6. Okay now we are going to create the "outer_rim". To do this your going to create a new layer and name it "outer" and follow the same steps from number 5 but expanding the selection to 20 pixels. When your done lets add a gradient effect like you did to the background (make sure you selected the "outer_rim" layer). Use this numbers for the gradient options:

7. Perfect! now we are going to add light effects to the icon. Create a new layer and call it "Shine1" > Pressing Ctrl+Right click select the "small_circle" later. This should give you the layers selection > select "Shine1" now select the Elliptic Marquee and pressing Alt while creating a circle on top of the selection should subtract from it and give you something like this:

Now fill the selection to white and bring down the opacity to 40%. That should give you the look from above.
8. In this step we are going to create a second light effect. Create a new layer and call it "shine2" > Select the Elliptic Marquee again and create a selection above everything about half way from the circle like so:

Fill that layer into white > Now pressing Ctrl+Right click on "big_circle" is going to bring its selection, still on "shine2" layer been selected press Ctrl+Shift+I. This inverses all the selection, than press Delete on your keyboard > Lower the opacity to 60%... you should end up with this:

9. Finally, to finish the light effect we are going to add a small SPEC on the top left shine > New layer > Name the layer "spec" > With the Elliptic Marquee make a small circle on top of the "shine2" layer > fill it in with white.
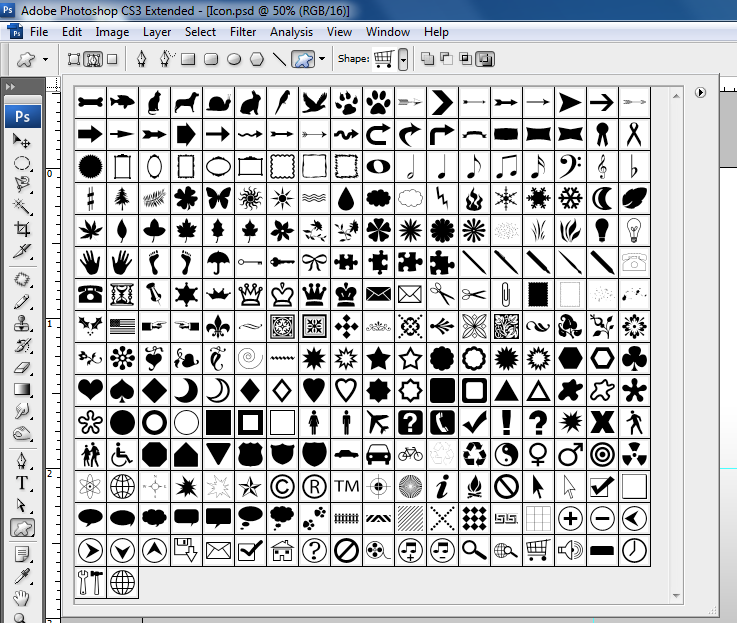
10. To finish the icon we are going to add the orange crown. To do this follow this steps > Select "custom shape tool on your tools section > Select on your shapes > Select the crown.
Now the Crown is a path so once you create the shape to your desired size to fill it you have to go to your "Paths" section and right click it, than it's going to give you the same options you dealt with before!

Now that you have created the crown and filled it with your desired color. position it above the "circles" and "rims" but below the "shines" and "spec" on the layer section.
To add a cooler effect to the crown add a "drop shadow" effect with the FX button. This are the numbers:

11. Awesome! Done with the icon but now we want to add that reflection... Its very easy just follow this steps. On the layer section highlight all the layers except for the background > press Ctrl+G, this is going to group all your layer into a folder.

Now right click on the folder and press "duplicate group". Once done, right click it again and press "merge group"

Okay now that the group is merged you are going to add a "layer mask" on the merged group.

Now with the "icon copy" selected press Ctrl+T. This is going to give you the option to transform your merged group. Right click on the "icon copy" picture and click on "flip vertical"

With that option, now you can slide your copied icon holding Shift until the touch tips at the bottom.

Good! We are almost done...I promise. Now press on the layer mask you created for "icon copy" and select your gradient tool (Ctrl+G).

Now with your gradient tool, click on the middle of the copied icon and pressing Shift without letting go of the mouse...go upwards to the middle of the original icon (release!) Just like magic =]


